How to Import Users, Agents, and Stations
In CXM, when the need arises to create batches of Call Objects (aka Users, Agents, Stations, etc.), the Import tool will cut down on the repetitive clicks that would normally be required to create them. It can seem like a daunting task at first to prepare the Import file due to the large number of permissions and options available. However, it can be time well spent because the same import file can be reused many times. For future imports, you need only to update a few required fields with the new information for the objects.
The best way to explain this process is to walk through it together. After you become familiar with importing data, you will not need to follow this exact process each time. We are going to take the “slow and steady” approach this time to prepare us for winning the race.
In this example, we will be Importing a list of Agents. The process is the same for most of the objects listed in the Admin menu bar. The differences will be in the number and type of data fields. Users are the most difficult to import due to the large number of permissions. Therefore, we recommend waiting until you are comfortable with the process before attempting to import Users.
Step 1. Create or Edit one Agent with the settings you want to replicate during the Import.
- Select Admin from the menu bar and click Agents.
- Click Create Agent to manually add the example agent or click the Edit icon in the action bar for the desired example agent.
- If you chose the Create a new Agent, complete the setup as you normally would and click Save to finish.
- If you chose to Edit an existing Agent, no changes are required. You can simply click Save to update the Agent.
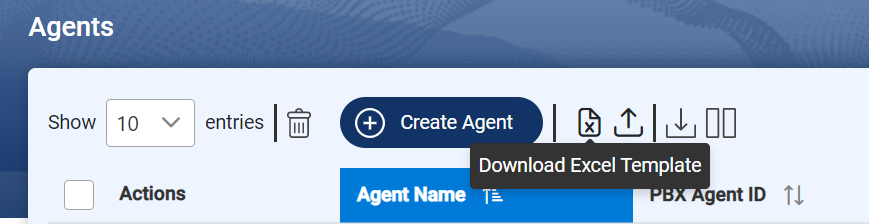
Step 2. Download the Agents_Template.xls file.
- Click the Download Excel Template button to begin the download.
- Make note of where the downloaded template file was saved on your pc. We will come back to it in a minute.
Step 3. View the Event Description in the CXM Audit Log.
- Select System from the menu bar and click Audit Logs.
- The Audit Logs page loads with the most recently logged UI events listed at the top of the data grid.
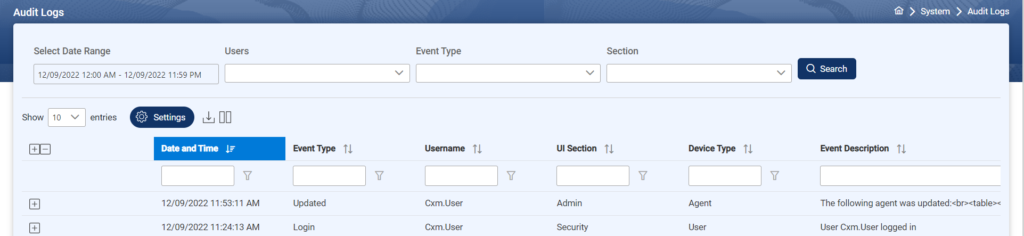
- We can see in row one, of the image above, that the User named Cxm.User completed an Update for an Agent.
- Click the + icon on far left of the row to expand the Event Description.
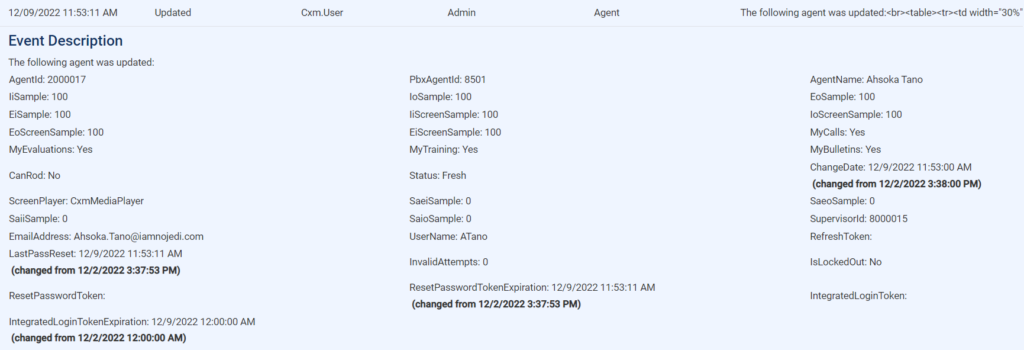
- We can now see all of the fields and current settings for the example agent.
- Leave this page open or take a screen shot of it like the one below. We are going to want thin information in the next step.
Step 4. Prepare the Agents_Template.xls file for import.
- Locate to the downloaded template file and open it with Excel.
- You will see that the Excel worksheet contains two tabs.
- The Bulk Data Import tab contains the data to be imported.
- The Data Guide tab explains each field in the Bulk Data Import tab.
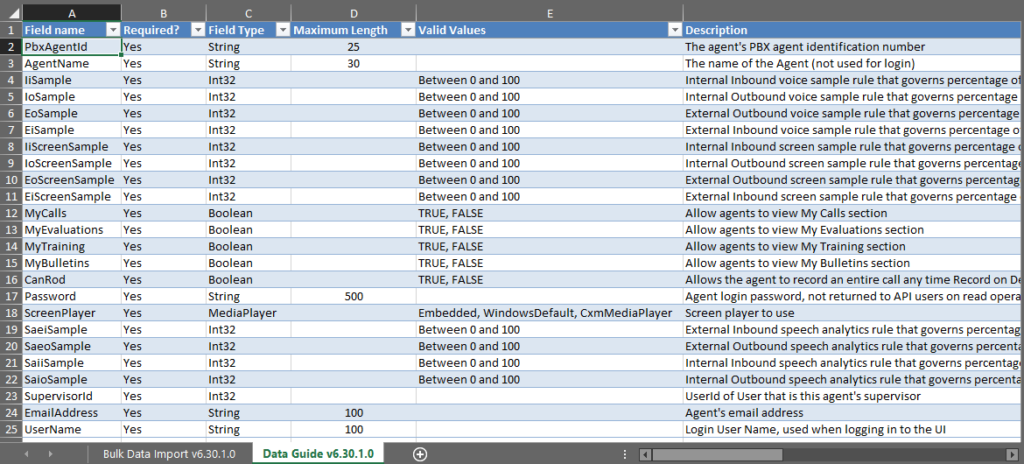
- Take a minute to compare the fields in the Data Guide with the fields shown in the Event Description from the Audit Logs. The Event Description does contain a few fields that are not in the Data Guide. That simply means they are not needed for the Import.
- Fields with a FieldType of either String or Int32 will need data to be typed into the field. All other FieldTypes with be completed with a list selection tool.
- When you are ready, click the Bulk Data Import tab in Excel, and we will get started entering our first agent.

- Take your time. Go back and forth as necessary between the Event Description and Data Guide to match the example agent settings with the fields in the Bulk Data Import tab.
- Save your completed agent_template.xls file. Feel free to rename the template. It can be helpful to have several copies with different permission sets.
Step 5. Run the Import.
- Return the Agents page in CXM.
- Click the Import button in the toolbar.
- Select to the completed agents_template file and click Open.
- The Import will complete, and the Agents page will reload to show the new agents.
Additional Tips for a Successful Import:
- All Boolean fields left blank will be imported as False.
- All Player fields (i.e. DefaultPlayer, AudioPlayer…) should be set as Embedded.
- The Status field should always be set to Fresh.
- The BrowseLevel field set to 1 is equal to Full Browse Enabled on the User page.
- Specific Call Object (Agent, Station, Group…) assignments cannot be created during a User import. They must be assigned manually to each user after the import.
